Animal Behaviour & Welfare Course
July 25th, 2014I signed up for the an Animal Behaviour and Welfare course, run by Edinburgh University through Coursera – they offer short online courses from universities available free to people all around the world. It’s the end of week two, and I thought I’d share some of the interesting things I’ve learnt so far.
What Drives Welfare Changes
The first week looked at what animal welfare is, some history and cultural and political influences. I know a lot of you reading my blog are involved in rabbit rescue and educating people to improve welfare. One of the interesting points was looking at what drives changes – public opinion or science. Public opinion is based on emotion so it can be a big motivator, but sometimes it’s not based on facts (scientific evidence) which risk the wrong information being distributed or bad decisions being made. On the other hand you can have lots of scientific evidence, but it’s there is no pressure to change – nothing happens.
It made me think about the recent muesli v. pellets issue in rabbits diet. Educators have been saying for years that pellets are the best option for rabbit’s diet but the public favoured the more visually appealing muesli mixes. It was only when the scientific study was published showing muesli was linked with health problems that retailers started to remove muesli products from sale. Having independent evidence as back up can help make a stronger case for change and also make sure you are advocating the right changes. It also makes me frustrated that we are still waiting on evidence from studies on housing sizes that will be useful for advocating for change from hutch manufactures.
Assessing Animal Welfare
Week 2 looked at measuring animals physiological and behavioural responses to understand how animals feel about their living conditions.
Physiological Measures
Physiological measures are changes to the body, the idea is you can measure animals emotional response to a situation by how their body reacts. For example, if an animal (or a person!) is frightened by something there is a rise in heart rate and brain floods the body with adrenalin (to help with fight/flight). There are also changes in hormones, which can be measured through blood, saliva and faeces, when animals are subject to ongoing stress, such as poor housing. This is particularly bad for welfare because it also changes the immune system making animals more susceptible to disease.
The difficulty with measuring physiological responses is that it can be tricky to do the measuring without causing stress that would influence the results. When a vet checks your rabbit’s heart beat it’s going to be higher than when relaxing at home because a trip to the vet is stressful, not because your rabbit is generally stressed out.
An example of physiological research in rabbits was a study that measured glucocorticoid metabolites (a hormones that increases when stressed) in rabbit droppings in different housing sizes and with/without enrichment. They found that the levels were higher in rabbits kept in unenriched cages implying they were less happy with their living conditions.
Another is research on ‘trancing’ rabbits (tonic immobility) – encouraging them to lay on their backs immobile, often used for nail clipping or just as part of human-rabbit interaction. It used to be thought by pet owners that rabbits were quit relaxed in this state, but when their physiological responses were measured researchers found breathing and heart rate were elevated and stress hormone levels were similar to those after known stressful events.
Buijs, S. et al.(2011) Glucocorticoid metabolites in rabbit faeces—Influence of environmental enrichment and cage size’, Physiology & Behavior 104 (2011) 469–473
Behavioural Measures
Behavioural measures – are much easier for us pet owners to use as they are easy to observe. The downside is they are open to interpretation and there is a risk of anthropomorphising (assigning human motivations which might be different to animal ones). The other problem is knowing what a rabbit is doing, doesn’t necessarily mean we know why.
The course introduced a few different measuring techniques:
Ethogram – This involves using a standardised list of behaviours, e.g. hoping, eating,washing, that everyone works from. You can then use this to measure frequency of behaviours in different living conditions. For example researchers have looked at how much time rabbits spend on different activities depending on the size of their housing and found that rabbits housed in small pens spent more time being inactive (sitting or lying down) and that they interacted less with the environment, than when housed in large pens. They used several different breeds of rabbits in the experiment so were also able to show that small rabbits were more active than large ones.
Choice or Preference Tests – This involves giving animals two options and recording which the animal moves towards most frequently – assumes animals will approach/stay with things they want/like. The drawbacks here are the choices are limited by what investigator provides, and we don’t know if they are exactly what they want or just the best of the options provided, or whether they suffer if they don’t get their preference. The responses could also be influenced by the animals previous experiences, age or sex, and the external environment (e.g. temperature).
Motivational testing – this test was developed from human studies into consumer demand. The animals learns to operate device to make choices, for example pushing through a weighted door or pressing a button a certain number of times. The idea is you can measure the ‘price they are willing pay’ to get resource the want, and that the harder they work the more they desire the resource. Researchers used this to measure rabbit’s desire for social interaction with other rabbits by comparing how hard they would work for food, social contact and access to a platform. They found their motivation for social interaction was almost equal to that of food. They do point out that it doesn’t tell us if they wanted companionship or had another motivation such as territorial issues.
The researchers also noted was whilst they were willing to gain access to the platform area, and spent a lot of time there, they didn’t use the platform much – they suggest this maybe because knowing they have access to a bolt-hole (the space under the platform) was very desirable even if they didn’t use it all the time.
Dixon, L. M (2010) The effects of spatial restriction on the behavior of rabbits (Oryctolagus cuniculus), Journal of Veterinary Behavior (2010) 5, 302-308.
Seaman, S. (2008) Animal economics: assessing the motivation of female laboratory rabbits to reach a platform, social contact and food, ANIMAL BEHAVIOUR, 2008, 75, 31e42
Qualitative Behaviour Assessment
The final thing was Qualitative Behaviour Assessment – looking at the whole animal moves around the environment, in other words their body language. I was surprised how new this approach is, I think the scientists might be a bit behind us there! In ethnography, for example there is no distinction between how a rabbit is moving. I’m sure you’ve noticed a rabbit’s posture when hoping can tell you what they are feeling. When they are nervous or being cautious, they move slowly and their body is closer to the ground – it looks very different to a rabbit normally hoping along. Likewise, a change in ear position can sometimes be the only signal that a rabbit has moved from a relaxed state to an alert one.
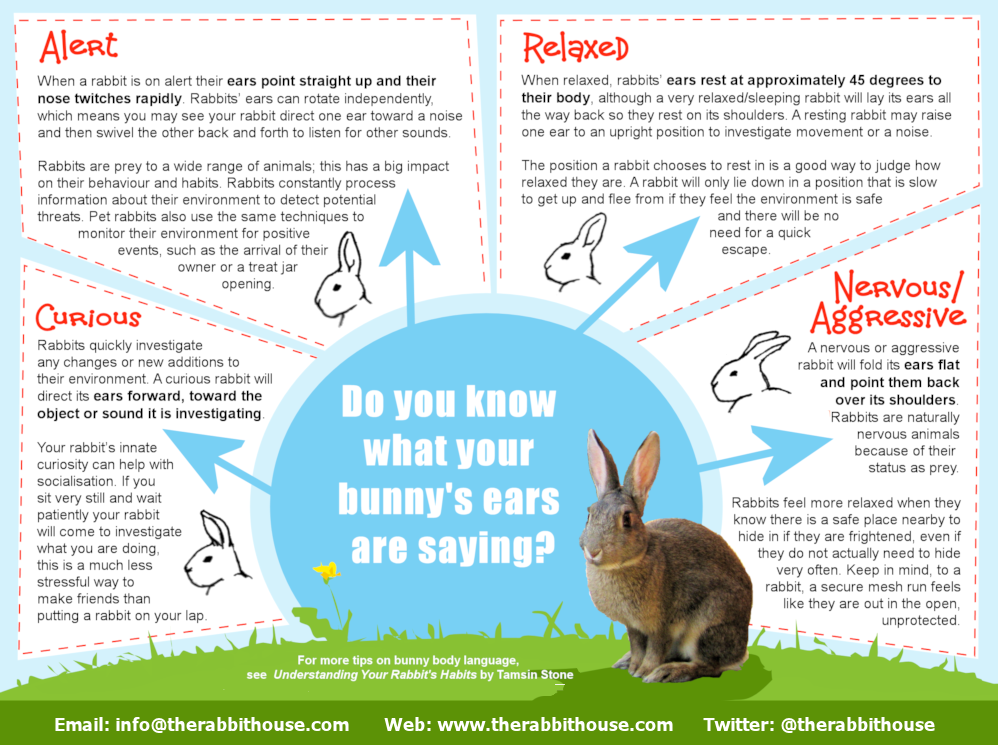
If you’d like to learn more about rabbit body language pick up a copy of my book – Understanding Your Rabbit Habits.
There is also still time to sign up for the course if you want to learn more about animal welfare and behaviour, it’s covering animals general including livestock – the rabbit examples here are my own but rabbits are meant to come up in next weeks lectures!